

Installation
How to assemble your MDOCK pontoon
Step-by-step guide to the modular floating system: cubes, pins, screws, clamps, railings, and water filling. Follow the sequence below, and the system will be correctly positioned in the water from day one.

Before you get started
Tools you will need
All tools are made of stainless steel and belong to the system. If you do not have the parts, they can be ordered with the system.
-
Torque wrench
Stainless steel torque wrench for the short and long pin. Insert into the holes in the pin and turn 45° to lock the pin.
-
Spanner
Stainless steel wrench for all screws and nuts — short and long screws, clamps, bollards and railings.
-
Steel casing
Used when the nut has to be tightened from underneath the cube — typically for railings in the middle and for stainless steel bollards and cleats.
-
Flooding key
Stainless steel key that opens the cube's lid so you can fill it with water and seal it tightly afterwards.
Step 1
How to install the cubes
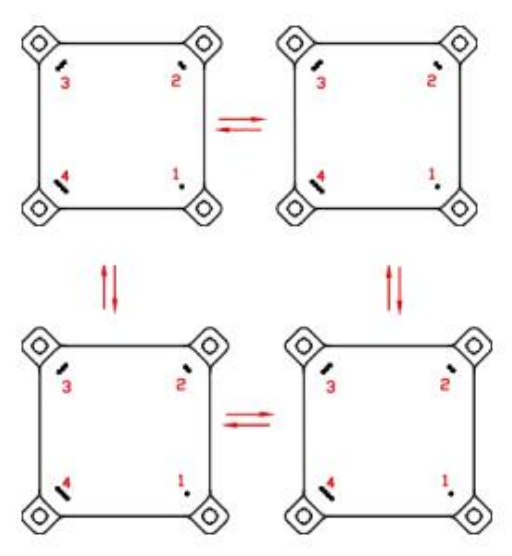
The most important features of the modular floating system are the four mounting eyes around each cube and the short pin in the middle that holds the eyes from four cubes together. It is this assembly that allows the platform to be expanded to exactly the shape and size you want—and to be built in multiple layers.
Arrange the cubes so that the eyes follow the sequence 1, 2, 3, and 4 throughout. Orient all cubes in the same way: the small holes must point in the same direction, so that the eyes meet precisely when the cubes are pushed together.
- Four mounting eyes on each cube — numbered 1 to 4
- All cubes are oriented in the same way, with the small holes pointing in the same direction
- The surface can be expanded to any shape and size
- Can be built in two or three layers with long staple
Step 2
The pin locks the cubes together
The pin sits in the middle and holds the four lugs together — it is this assembly that turns a surface of loose cubes into a single system. It comes in two lengths, and the choice depends solely on how many layers the pontoon is built in.
The installation itself is the same for both:
- Insert the pin through the four mounting lugs, ensuring it is in the unlocked position. The holes at the top should be diagonally across the joint between the cubes.
- Insert the torque wrench into the holes.
- Turn the pin 45° clockwise to lock it. The holes at the top should now be aligned with the joint between the cubes.
- Remove the torque wrench.
Step 3
Screws and nuts along the sides
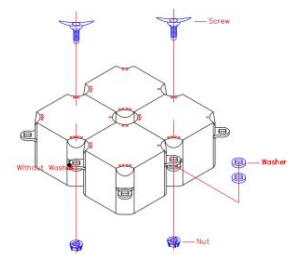
The screws hold the cubes together at the sides, where the eyelets meet in pairs. The screw is available in two lengths, and the choice depends – as with the pin – on how many layers the pontoon is built in.
The installation itself is the same for both:
- Insert the screw through the eyelets on the side of the cubes.
- If there is a gap between eyelet 1 and eyelet 4, add 2 washers to fill the space.
- Attach the nut from underneath.
- Tighten the nut with the stainless nut wrench.
If the eyelets meet without a gap, no washers are needed.
Step 4
How to install the cleats
The clamp is inserted into the same eyelets as the screws – no drilling or on-site adjustment is required.
- Insert the clamp through the eyelets on the side of the cubes.
- Attach the nut from underneath.
- Tighten the nut with the stainless steel nut wrench.
The procedure is the same as for the short screw.
Step 5
How to Install HDPE Railings
The HDPE railing can be mounted both along the sides of the pontoon and at the connection points between the cubes. Follow the relevant instructions below depending on where the railing is to be placed.
Railing along the sides:
- Thread the railing through the mounting eyes along the edge of the pontoon.
- Place three washers at each railing.
- Tighten the nut from underneath so that the railing is secured.
- Check that the rings on the railings are aligned.
Railing in the middle:
- Thread the railing through the mounting eyes at the connection point between the cubes.
- Place one washer under the railing.
- Tighten the nut from underneath. A steel sleeve will usually be necessary here.
- Turn the railing 45° until it locks.
Step 6
How to fill the cubes with water
If the construction requires ballast, the cubes are filled with water. The filling hole is located on the side of the cube at eye 1 and eye 4.
- Find the cover on the side of the cube.
- Open it with the stainless flooding wrench.
- Fill the desired amount of water into the cube.
- Close the cover tightly again.
The water trims the system so that it floats correctly. On the jet ski dock, the amount of water is a fixed part of the construction — see measurements under step 10.
Step 7
How to install stainless steel bollards, cleats, and railings
The stainless steel fittings are mounted through the eyelets on the cubes and locked from below – unlike the cleat on the side, which is tightened from the outer edge of the cube.
- Place the bollard, cleat, or railing through the eyelets on the cubes.
- Place the stainless steel nut on from below the cube.
- Tighten the nut – use the steel sleeve if the nut is too deep for the wrench.
Step 10
How to install V-Cube Jetski Dock
The V-cube dock is assembled using the same pins, screws, and nuts as the rest of the system. The incline that the jet ski rides up is created by filling the first two rows of cubes with water.
- First row of cubes
- approx. 70 liters of water — corresponds to approx. 28 cm in the cube.
- Second row cubes
- approx. 35 liters of water — equivalent to approx. 14 cm in the cube.
Step 11
How to Install the Rolling Cube Jetski Dock
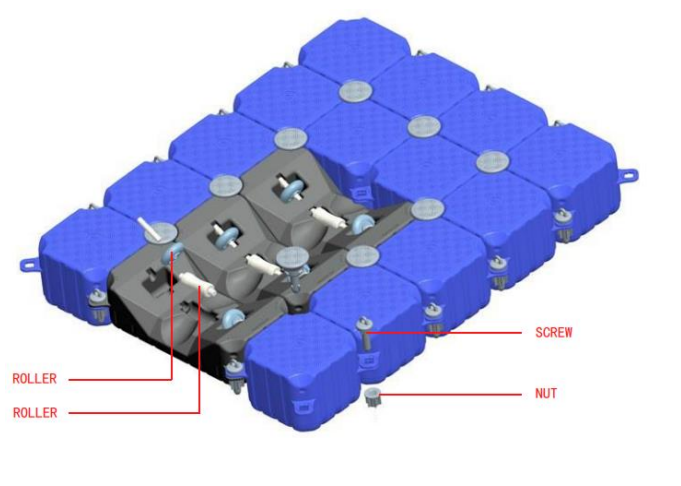
The roller cube dock is built in the same way, but with roller cubes in the middle section of the dock, so that the vessel rolls up under its own power. The rollers are secured with screws and nuts, just like the other modules.
Step 12
How to Install an HDPE Bollard
The HDPE bollard is not fastened with a nut, but locked with a turn – the same principle as the short pin.
- Locate the connection point between four cubes where the bollard is to be mounted.
- Insert the bollard through the four mounting eyelets in the unlocked position. Here, the handle should be diagonal across the joint between the cubes.
- Turn the bollard 45° clockwise until it is in the locked position. Here, the handle should be aligned with the joint between the cubes.
Questions along the way
This is often a cause for doubt
How much water should be in the cubes on a jet ski dock?
The first row of cubes is filled with approx. 70 liters of water (approx. 28 cm in the cube), and the second row with approx. 35 liters (approx. 14 cm). The water gives the dock the correct incline, allowing the jetski to drive up under its own power.
When should I use washers?
Two washers are used where there is a gap between eye 1 and eye 4. If there is no gap between the eyes, no washers are used. HDPE railings on the sides require 3 washers per railing, while railings in the middle only need 1 washer.
How can I tell if the pin is locked?
Look at the holes at the top of the pin. Before locking, they are in the unlocked position; after a 45° turn with the torque wrench, they have moved, and the pin is secured.
Can the pontoon be built in multiple layers?
Yes. The system can be built in two or three layers. Use a long pin in the middle and long screws through the eyelets on both layers — the procedure is the same as for a single layer.
Can I expand the system later?
Yes. The cubes are assembled with pins and screws, so you can connect more cubes or change the shape as needed. Just follow the same sequence with eye 1, 2, 3 and 4.
Do I have to do the assembly myself?
No. MDOCK offers professional installation throughout the country — we deliver, assemble and commission the system. Contact us for a quote.
Are you in doubt along the way?
Call us while you're working with the cubes. Our installers know the system and will gladly help with the order, discs and water quantities — or let them handle the entire task with our professional installation service.
Shall we install the system for you?
Our fitters deliver and assemble your MDOCK system nationwide — ready for use from day one.